
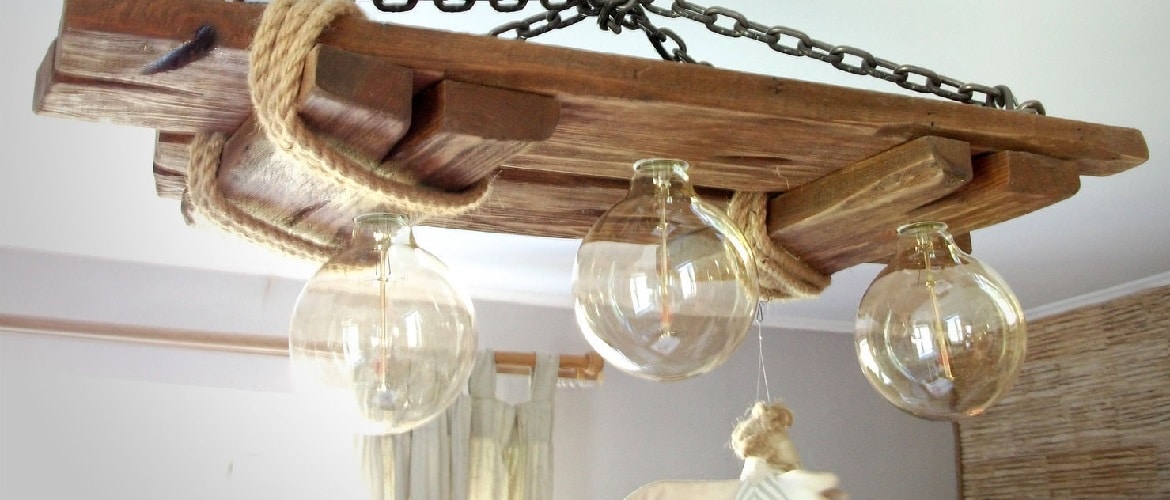
Any handmade farmhouse chandelier will complement the living space in an original way. This is hardly anyone will deny. Such decorations give your interior an industrial character, fill the living space with an atmosphere of comfort, and add zest to the design. When building a custom model, people will not only save money but also have a lot of positive emotions when developing the concept and assembling the elements. Your own solutions are also a great opportunity for personalization — choosing colors, shapes, and decorations. In this regard, any novice artisan will have no boundaries. Let’s look into this in more detail.


Advantages of Wooden Chandeliers
Any wood chandelier is distinguished by its specificity. This applies to both the performance of light sources and the operating rules of the connected equipment. Luminaires made of such material should be shaped so that all elements that are heated (sockets and lamps) are as far away from the wooden structural components as possible. It is better if the lamps are directed upwards. In this case, heated air will not deform the wood. Despite its specificity, this material has many advantages. Here are 3 main reasons to build a wooden chandelier:
- Wood is an environmentally friendly material. Due to such specificity, lighting equipment made from such material is in high demand among owners of country cottages. The same goes for bath and entertainment buildings. Most modern models are bulky. Such wooden structures are associated with different original styles, such as the Baroque or English Empire style.
Most chandeliers not only do not emit harmful substances but also saturate the air with aromatic resins that make it easier for asthmatics to breathe and neutralize inflammation of the respiratory tract. You will immediately feel it as soon as you walk around the floors of a wooden building for 10-15 minutes, right? Although this is perhaps not the main reason why people decide to build a farmhouse wood chandelier. Most lighting designs impress with other advantages.
- Due to the variety of shapes and solutions, rustic chandelier lighting looks impressive in any room. This material lends itself to processing, which opens up additional opportunities for creativity. You can build a chandelier from battens, bottles, string, metal frames, and more. In any case, it will look original. If the manufacture of a lamp made of plastic or chrome-plated metal requires devices that are not in a standard city apartment, then wooden lamps for production require a minimum set of hand tools. Even dinner sets and cardboard boxes will come in handy. Although in any case, you will have to find a drill and a hammer.
- Most farmhouse wood chandeliers are in harmony with any style. You can find a lot of photos to see the benefits. Each wooden element in the interior of the room is subconsciously associated with warmth and comfort. Traditionally, home chandeliers harmonize with oriental motifs, classic ideas, and even country style. The geometric correctness of the lines and the warmth of natural wood contribute to a peaceful atmosphere. It is also impossible to furnish the room with Baroque and Classicism style ideas without the use of natural materials. The massive appearance of the fixtures will invariably create a feeling of admiration.


Note: Despite the advantages of wood, not all types of materials are ideal for creating chandeliers. A novice craftsman should be especially meticulous. It is worth considering the strength of structures and the specifics of the material. Any experienced craftsman will attest that ?onifers are much less affected by insects and rot. Wood absorbs moisture from the air, after drying it can deform and crack. If you want your lamp to retain its appearance for a long time, you will have to provide it with a more or less constant temperature and humidity.
Farmhouse Dining Room Chandelier — Key Components
A unique handmade wooden chandelier will complement any interior. Its design is chosen with regard to the style of the room. Most home lamps have an original shape that attracts attention. Some models are associated with rustic motifs from different historical eras, including the Renaissance and Baroque. It is now fashionable to use such chandeliers in restaurants, museums, and other places. As a rule, the master will need 5-7 days to build such lighting. Befor to assemble a chandelier, people should prepare:
| Bottle, jar, or other glass containers | A wooden chandelier is more durable than a glass one. But this does not mean that you can completely eliminate the use of fragile materials. Such elements can be used as a lampshade. The choice of shape, sizes, and other parameters will depend on which style is in priority.
Of course, people can simplify their tasks by purchasing a special decorative ball. With a ready-made element, they can create a magnificent lamp. But you can save money by using old, unwanted dinnerware or other utensils. |
| Sticky decorations | Enthusiasts can use stickers and paints for glass or ceramics. It is worth choosing depending on the effect you want to have. As a rule, when creating a farmhouse dining room chandelier, people do not limit their creativity. The more decorations, the more effective the lighting will look. |
| Lamp holder | People prefer metal elements into which any type of light bulb can be screwed. Most models have a ready-made plug, although if artificers build a ceiling light, they will have to lay wires to the electric cube. In such cases, you should strictly adhere to the recommendations of experienced electricians. If you are not sure about your knowledge in this matter, it is better to get advice from a professional. Take care of your safety to avoid short circuits and other incidents. |
| Matching light bulb | Wood is a flammable material. So when making a chandelier, you need to pay close attention to laying and insulating wires. The same applies to the number and power of light sources. If people want to achieve an additional aesthetic effect, they choose a decorative, colorful, or stylized light bulb, such as retro or industrial. But every craftsman must accurately calculate the power grid load in order to avoid unwanted incidents when the overcharged wiring caused a fire. |
| Basic design | You can choose from solid wood beams, metal gratings, and other design ideas. In any case, it is worth making sure of the strength and durability before starting the assembly. Also, consider the need for painting and varnishing some elements. When creating chandeliers, people can use impregnations that reduce the combustibility of wood. Such additional finishing of the material makes the work more expensive but prolongs the life of the product. |


Wooden Chandeliers Lamps
Choosing the right lighting element is the most important step for beginner craftsmen. People usually decide to buy a device with a nozzle for the so-called fine thread (E14) or large thread (E27). But, they can not put traditional incandescent bulbs in such a socket. It’s much better to buy an LED light bulb that looks almost identical but consumes less than 1/10 of the electricity. Unlike the less aesthetic spiral-shaped energy-saving fluorescent lamps, you can choose from many types and sizes of LED models. You can check the technical parameters of each lamp with a consultant from any hardware store. In some cases, you need to be an experienced electrician to figure out which bulb is best for your lighting.
How to Make a Chandelier — Step by Step (Basic Algorithm)
Wooden chandeliers effectively harmonizes in any interior, especially if such products are made for the Country or Provence style. This is an irreproachable fact, which hardly anyone will deny. Now, environment-friendly designer lighting is in fashion. Hand-made models allow people to show their imagination and make a work of art from improvised materials. Even homemade lamps made from tree branches look exotic. But in order for your craft to work effectively and not break often, you need to be meticulous. As a rule, for people who want to build rustic chandelier lighting, the algorithm is as follows:
- First, make sure that the light bulb fits into the glass dome, whether it will fit in it at all or, on the contrary, whether it will be too small. Often the mismatch in size is the cause of disappointment. This is because either the brittle material cracks or the whole structure looks unaesthetic. You should take into account such nuances before you start arranging the found materials into one solid structure.
- Then cut a hole in the lid of the jar or other glass containers. This is perhaps the most important step. If the artisans prefer the bottle, they will have to cut it in half. People can use a knife or if they don’t have one, a hammer and nail. The second method will take longer but will give the same results. With a nail, several dozen holes must be made, one next to the other, until the desired shape is cut, most often it’s about a circle. If you are making a hole in the bottom of a jar, you cannot do without a drill and a glass cutter. The same goes for dinnerware and bottles.
- Make sure the hole fits exactly or slightly smaller than the lamp base diameter, never too loose. If you want to put a light bulb in a bottle, you will need a special glass cutter to fit the light source inside. If people have chosen a jar, they need to have at least initial experience with the material. Beginners usually give up the idea after they break a few glass containers. All because they can not withstand manufacturability.
- Put the lamp base into the hole, screw the socket. Make sure that the design does not creak and looks aesthetically pleasing. Optionally, people can decorate the lampshade. Although this is not a mandatory step, requiring additional costs.
- Finally, connect the lamp to a power source — ceiling, wall outlet, or battery. If there is a plug on the holder, just plug it into the socket. When the lamp is powered by batteries, put the batteries in the correct place and turn on the light.
Connecting Lampshades & Woodworking
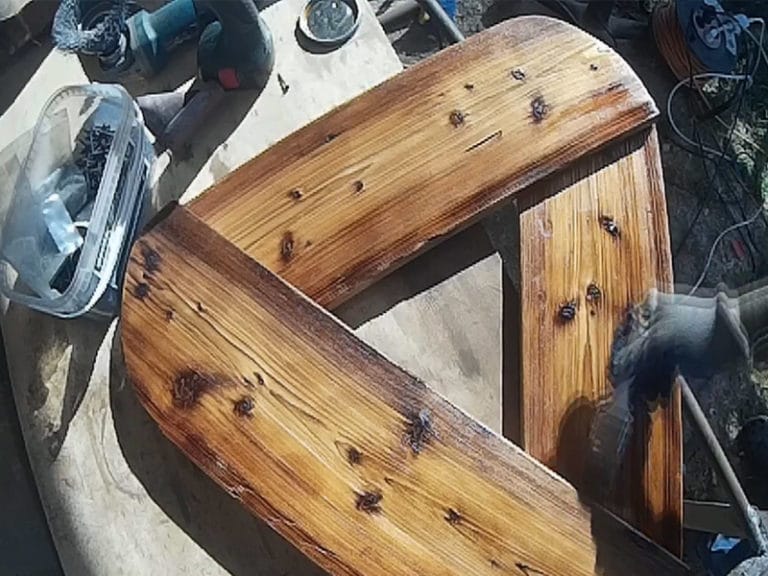
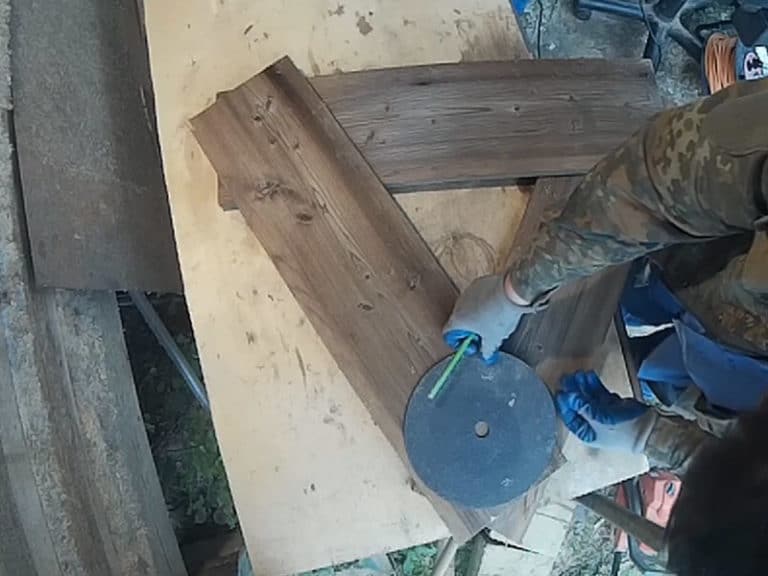
To make a chandelier, people must have experience working with a material. Without this, their product will not be as aesthetically pleasing as expected. It is required to be able to cut wood, grind it and correctly join wood pieces. When arranging ceiling lighting, one way or another, it will need to be connected to an electrical junction box. While not a difficult task, it does require some skill. People need a screwdriver with a voltage tester. Such equipment is used to check which wires carry electricity. Novice masters will also need a ladder or other secure platform to reach the ceiling comfortably. Equally helpful is the following:
- Electric drill
- Screwdriver
- Ruler
- Wood saw
- Marking pencils
If you decide to upgrade your lighting, do not forget about electrical safety. Make sure the lamp holder and shade are hanging securely so that the light can be turned on. Remember to disconnect plugs when working on the electrical system. Power cables protruding from the ceiling are screwed directly to the plinth using special screws. If you are not negligent, you can avoid electric shock incidents.
What About Energy Efficiency?
Decorative spheres and their core can take a variety of forms — white or gold. Moreover, you can improve your chandelier technologically. Any smart bulb offers almost unlimited possibilities. People can change the colors of the light and turn the lamp with the remote control or even with smartphones. Standard incandescent bulbs get very hot and are therefore not suitable for installing in wooden chandeliers. The same goes for halogen ones. Instead, it is better to buy an LED, fluorescent light source.
Wooden chandeliers are used even for modern interiors. To create a new style, non-trivial solutions are ideal. The best idea is to use battery power, such as inexpensive and commonly available LED chains that look like Christmas garlands. LEDs consume so little energy that one battery lasts for many hours of light. A living room lamp can also be made with a classic E27 fitting, a cable, and a ready-made plug. The advantage is that it is powered directly from the electrical mains.
Choosing a Chandelier Style — Best Ideas and Tips
A chandelier in a country house is not just a lighting device but a decorative element that brings into the room a special charm. Any experienced designer understands the significance of such a structure. If people prefer individualism, they do not need to buy a chandelier in a store. As a material for the manufacture of a wooden structure, almost any available tree species is suitable. The main condition is that the wood is dry. Here are the properties of the most commonly used types:
- Pine. Well to processing. The growth circles are split up by resin, so this material is not suitable for making small parts.
- Cedar. It is remarkable for its beautiful pink base. The wood has high strength, so people can make small decorations from it.
- Deciduous species. Stronger than pine, do not rot.
- Oak. Differs in high density, but easily splits. This material is not easy to process, so novice craftsmen should not use this material.


Advantages of Wooden Chandeliers
Of course, a handmade chandelier will look spectacular if you take into account the smallest nuances. This applies to wood processing and the assembly of components. It is worth doing this work with scrupulousness. Only in this case, your product will match the style. Let’s figure out how to make original lighting structures for your country house.
Rustic Chandeliers — Best Ideas
It’s more about lifestyle than indoor décor. Most chandeliers are associated with the simplicity, the traditions of artisans and harmonize well with all kinds of furniture. Warm colors and adjustable fixtures are key advantages of wooden chandeliers. Rustic lighting is a common concept, as this style is closely related to other trends, such as Scandinavian and Provencal. An unusual lamp made from a teapot is a good idea. When installing and assembling components you will need:
- Wooden beam or boards
- Kettle
- Wire
- Electrical fuse
- Metal chain or rope


Step by step guide to create original rustic chandelier:
- First, you should cut out the bottom of the teapot. This is done in such a way that the resulting cutting edge is not sharp. Otherwise, you can get hurt.
- Next, on the lid of the kettle put an electronic cassette, the wire of which is led out through a small hole drilled at the top.
- Treat the boards with sandpaper, hook them with self-tapping screws to create the desired shape of the base for fastening.
- You should attach to the handle of the kettle a chain, through the links of which wires pass. Your lamp is ready.

A luminaire with a single light source looks great in a small living room due to the ability to adjust the light point in height. This solution is ideal for dining rooms and large kitchens. But you can also add 3-4 lamps by changing the shape of the base. A well-chosen model, type, and style of the lamp, and most importantly, its correct location will help achieve various effects: visually expand the space, hide wall defects, create an intimate atmosphere in the room, emphasize interior details, and much more.
Country Style Interiors — Best Ideas
Traditionally, the country-style house has high ceilings, so large chandeliers are appropriate. Candle-shaped lamps bring harmony to such an interior. The main thing is that the light is warm and soft. Rustic lamps with 4-5 bulbs and imitating gentle flames best suit such solutions. In addition to the living room, a country-style chandelier can also be installed in the bedroom. Glass bottles, especially if they are beautifully shaped, can be used to create a gorgeous model. Required material:
- Thin rope
- Flammable liquid (alcohol or gasoline)
- Glass bottles (preferably colored)
- Edison lamps (with a beautiful spiral)
- Electric wire and plinth


Do it yourself:
- Roll the rope along the bottom of the bottle, after wetting it with a flammable liquid.
- Set it on fire and let it break. Slowly twist the bottle around its axis until the rope burns to the end.
- Lower the bottle into a container of cold water. Wrap it in a towel and tear off the bottom with a little effort.
- In order not to cut the edge sharply, it must be polished. To do this, dip the bottle in sand or small gravel for a few minutes.
- It remains to correctly assemble the electrical cassette, thread the wire through the neck, and screw in the light bulb.


Do it yourself:
Such chandeliers are associated with medieval romance and jousting. The interweaving of forged metal elements gives this design a unique flavor. This chandelier will perfectly fit into any interior, especially if hung over the bar counter.
Classic & Baroque Interiors
Any classic style looks perfect in lofts and country houses. Although choosing a spectacular model that reflects the spirit of a bygone era is not so easy. To have the maximum effect, people should build a chandelier made of natural material. A wooden beam with carved patterns will be a wonderful, folk solution. Beautiful lamps made from jars fit perfectly with any Classic and Baroque style. People can assemble such a model just as easily as a bottle structure. The only difference is that the bottom of the pot does not need to be cut off, because usually clear glass is used. You need to find:
- Jar with thick walls (preferably with a convex pattern)
- Hammer and nails
- Wire, electrical insert
- Spray
- Edison lamp
Making a beautiful chandelier, step by step:
- To begin with, you should make holes in a circle around the lid with a nail and a hammer. Then the inside is gently squeezed out. The diameter of the circle must match the plafond.
- Place the plinth in the cover, fix the cable.
- You can decorate it. Metallic paint with gold overflow looks good.
- It remains to screw the lamp, close the cover and install the chandelier in the place where it is attached.
Loft Style
If you prefer something cheaper, lamps designed with industrial work well. Stylized metal shades on chains look like factory lighting and add an austerity, contrasting nicely with rustic warmth and comfort. When people use glass lampshades, reminiscent of their oily predecessors, it will create an incredible effect. Retro-style Edison’s models are ideal for a loft. A beautiful bottle chandelier is a perfect solution for a loft. Such lighting suits a kitchen or dining room well. All materials you can find in the basement, in the kitchen, or in the garage. Required for work:
- Colander or another metal frame
- 3-5 glass wine bottles
- Plafond lamp
- Electric wire
A pendant lamp with a cutlery holder looks perfect. Turn your old fork and spoon holder into a structure with a simple light bulb cord. You can even change the color of the light as the seasons and trends change, then it’s always relevant! Detailed instructions:
- Remove the label from the bottle.
- Carefully cut out the bottom, sanding the edges so as not to cut your hands
- Pull the electrical cable through the necks, attach the sockets and turn on the lamp
- Attach electrical components to colanders and hang the structure from a wooden beam
- Connect the assembled chandelier to the mains, check the performance

Industrial style can be created not only with a colander but also with other improvised materials. A metal pendant lamp will fit perfectly. The sheets that are used to cover the car’s radiators can be used to create a sophisticated unit. You can hardly deny that industrial design with a metal shade looks good in any bedroom. Such a chandelier can be painted with gold. It remains to add a few washers, screws, and lighting lamps, and a stunning design is completed.
The simple and ingenious hanging lamps from paint cans are also a good idea. It’s amazing how spectacular it is to hang such a chandelier over the dining table! Try to use large jars that may have been lying in the attic for a long time. Turn 3-5 giant metal cylinders into beautiful chandelier bases.
Chandelier “Coffee Day”
Massive wooden ceiling chandeliers appeared in the early 16th century. Most often, the main elements were tree branches, on the edges of which people fixed candles. Castles and churches of wealthy gentlemen were then the main areas for original lighting models. In those times, wooden chandeliers performed only lighting functions. But this is hardly about the original structure of “Coffee Day”. Now, the forms that wooden chandeliers can take are only limited by your imagination. People can attach the parts with a drop of glue or a screw. Despite the bulkiness, such models are assembled in 1 day. You will need:
- A board from wood. Suitable pine, spruce, or birch. If you choose oak, the product cannot be painted or varnished
- 3-4 coffee cups and saucers
- Three holders on a small stand with clasps to them.
- Three identical light bulbs, preferably LED
- Two-core copper wires of minimum cross-section
- A thin chain or twisted thread to hang the structure
- Four screws
Additionally, you will need a drill with drills for wood and tiles, pliers, and a screwdriver.

Step by step:
- Treat the planed board with sandpaper — first large, then finer
- Drill holes for cartridges
- Cover it with a stain and after drying, varnish it twice
- Drill holes in the cups and saucers using glass and tile drill bits
- Assemble the lamp into one piece using drilled leads
Antique wooden chandeliers are still relevant for villages and cottages. People who prefer non-standard interiors can assemble a simple chandelier with their own hands. If a solid wooden beam is a frame, it’s a good idea. Worrying about the high cost of a chandelier is justified only when people choose complex constructions. In most cases, the price falls into the budget category.
Conclusion
An exclusive handmade wooden chandelier will be worthy of any interior decoration. The variety of ways to design lighting fixtures is amazing. It is not necessary to buy expensive models from reputable designers. You can assemble an original wooden chandelier with your own hands. The proposed ideas will make it easier to choose the shape of a wooden lamp and help the novice master to prevent the most common mistakes.

Leave A Comment