

How to Install a Chandelier
A chandelier is a decorative light fixture, includes branches that contain multiple light bulbs or candles that hang from the ceiling. You can see chandeliers in kitchens and living rooms, but you may install them in almost any area in the house or farmhouse to create a sophisticated and exquisite environment.
A farmhouse chandelier gives your farmhouse a sense of elegance and drama. That can define your entrance, glam up the rooms, or provide a stylish touch to your farmhouse. An inexpensive and quick option to modernize your farmhouse is to replace an old light fixture with a chandelier.
Do you adore your entire home’s lighting? Does your farmhouse need an elegant touch with a farmhouse chandelier? If yes, do you wish you, How to Install a Chandelier, so you wouldn’t have to get someone to do it for you? We will discuss all these queries in this blog.
Essentials Required to Install a Chandelier
Depending on the type of chandelier you are using, the equipment you’ll need to install it may differ. The work of removing and installing a chandelier is much easier with the help of another person.
The following tools and materials are required for a conventional chandelier installation:
| Tools Required | Materials Required |
|---|---|
| 4-in-1 Screwdrivers | Stepladder |
| Wire strippers | Light texture |
| Needle-nosed pliers | Electrical box |
| Non-contact voltage tester | Electrical tape or heat shrink tubing |
| Tape Measure | 10-32 ground screw |
| Power drill |
New chandeliers usually come with their own set of instructions. We recommend you carefully follow the manufacturer’s instructions for how to install a chandelier.
A basic understanding of electrical systems is crucial to installing a chandelier.
Chandeliers are installed with intricate electrical installations, and the prospect of installing one yourself might be scary. Installing a chandelier can be done by an electrician or a simple do-it-yourself project if you know how to use basic tools and are comfortable working with electricity.
It is installed in the same way as any other light fixture, regardless of the style of the chandelier. If you already have an old chandelier in your home or farmhouse the task will be as simple as removing it and connecting a new one to the current wiring system.
Because this task has the risk of electric shock, it’s better to seek the advice of a skilled specialist if you are unsure or feel uneasy.
Instructions for Wiring a Chandelier
For wiring a chandelier you would consider all the instructions in the same way you usually follow for any other light fixture. You will need to connect your load (black), neutral (white), and ground cables.
There are different chandeliers with wires that are not in the same black and white color scheme as the rest of the light. Please make sure that you are reading the wiring instructions for your chandelier carefully and remember to turn off the power before starting the installation.
Furthermore, your chandelier has a light switch that is already attached to it. In that case, In the Electrical Box connect only the loads that are in black colored wires to your chandelier and skip the neutral wire.
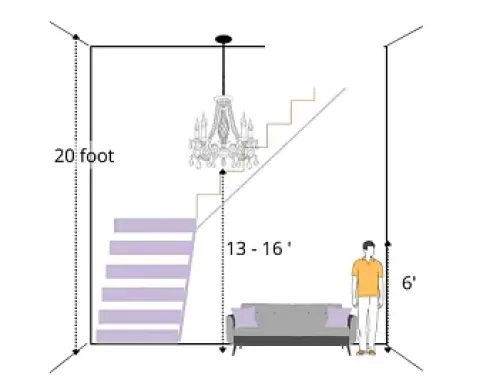
Chandelier Ideal Height
The chandelier’s height affects how it works as a lighting fixture and as a decorative feature in the room. The bottom of a chandelier should install between 30-36 inches above a table with an eight feet ceiling.
For ceilings that are higher than eight feet such as in the farmhouse, always keep in mind that for every extra foot of ceiling height you should raise the chandelier at least three inches from the bottom.
However, you may also change the height of the farmhouse chandelier according to your preference and surroundings. You can change the height according to the size of your room, table, and the quantity of light you want in the room. A chandelier’s primary duty, aside from ensuring that it looks excellent in your room, is to provide illumination. For ideal chandelier height, there are no fixed rules. The most crucial thing is that your chandelier is installed perfectly in the room.
Recognize Mounting Systems
It is recommended to assemble and adjust all the parts before climbing up the ladder. Whether your chandelier is installed in the metal box with screws or a threaded pipe, start by threading the screws or pipe into the crossbar.
Then you should arrange the crossbar in a line with the base of the Canopy. Then, adjust the screws or pipe. Do all this assembling while your chandelier is still on the ground. Then attach the crossbar to the metal box to secure the wires and support the weight of the chandelier. You should screw the mounting bracket on the ceiling and then the chandelier.
How to Calculate Box Sizes
The electrical boxes are essential parts of the electrical system. However, many non-professional electricians and homeowners are unaware of the extensive range of boxes. Plastic and metal boxes are available with different shapes such as round, square, and octagonal boxes, and boxes with weight ratings.
When you are selecting the box consider both box volume and box fill. Calculate the entering of the box according to each wire(neutral, hot, and ground wires). To get the perfect sized box to consider the cubic inches of the box volume. Make sure that the box volume should be more than or equal to the box fill. You can also get the ideal size from the minimum box size specified by the National Electrical Code.
How to Install a Chandelier in Simple Steps
Safety first, make sure you take all required safety precautions before removing the old chandelier. You may also need help if you are removing a large farmhouse chandelier. The following are the simple steps for removing an old chandelier:
1st Step: Disconnect the Old Chandelier and Examine the Wiring
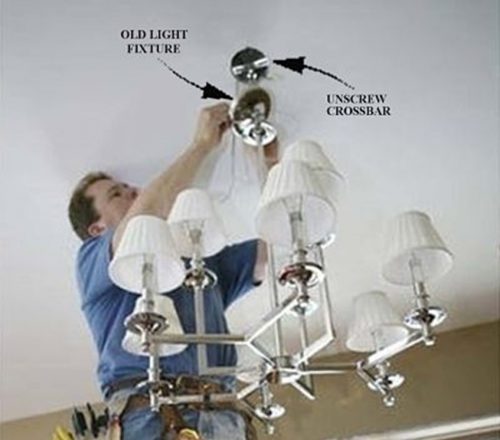
- To begin, turn off the power at the main electrical panel. Working on a live circuit is never a clever idea.
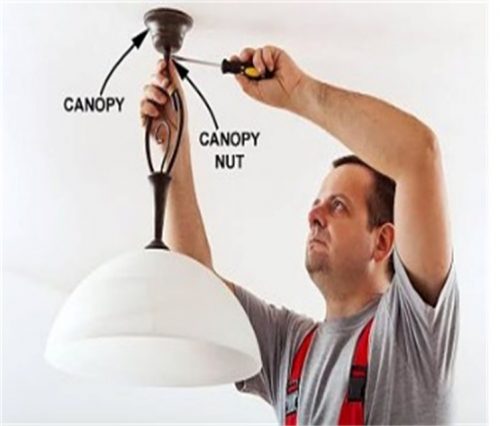
- Pull down the dome-shaped Canopy by removing the nut or screws that hold it in place.
- Then to lower the chandelier, unscrew the connection of the crossbar to the Electrical Box.
2nd Step: Use Non-Contact Voltage Detector to Check the Power
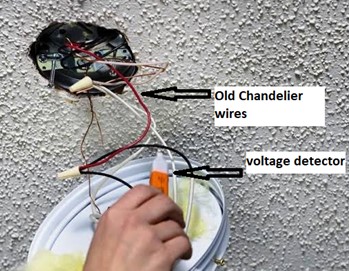
- To ensure that the electricity to all wires in the box is switched off, move the non-contact voltage detector around the box.
- Keep the light switch on of the non-contact voltage detector. If you will notice that the tester light turns on, then turn off your main electricity breakers or remove fuses.
- Remove the old chandelier’s wirings and disconnect them. Leave the ceiling wirings of the house connected and tucked away in the Electrical Box.
3rd step: Check for the Presence of a Hot Wire.
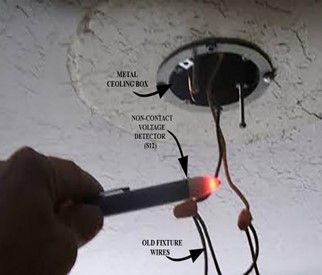
- Now turn on the electricity from the main power panel of that place.
- Keep the light switch on of the non-contact voltage detector.
- The non-contact voltage detector will indicate the electricity in the colored hot wire.
4th Step: Examine the Ground Wire
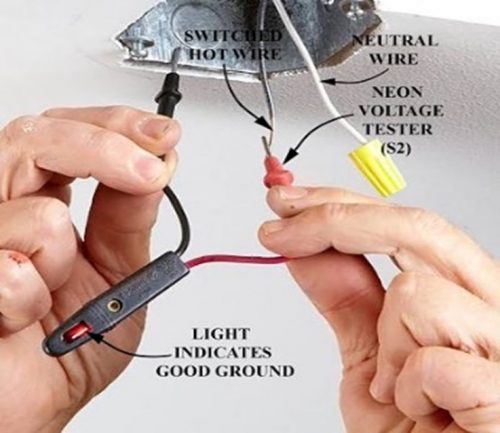
- Use a voltage tester to check the ground wire.
- Your tester will indicate the ground bare copper wire and metal box.
- Now after indication, you can proceed.
- If the voltage tester does not indicate the light, it means there is no ground wire.
Note: Hire a licensed electrician to attach it. Before starting the installation job, turn off the power at the main electricity supply.
5th Step: Add a Ground Wire to a Metal Box
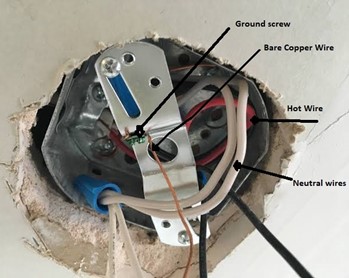
- If you did not find the ground wire there, connect it to the metal box.
- Wrap the ground wire from your light fixture around the ground screw and connect it to the bare copper ground wire from your home.
- Use clockwise direction for wrapping the wire around the screw.
- You must first ensure that a mechanism of grounding is available.
6th Step: Assembling Parts on the Ground Reduces Overhead Work

- Manufacturers will provide instructions to assemble all the parts of your new chandelier.
- Manage the ideal length of the pipe on the collar loop
- Now align the rear of the Canopy with the crossbar.
- Tighten the locknut against the crossbar to secure the threaded pipe in this position.
Note: If you will assemble all the mounting hardware at the ground before climbing the ladder, you will save time and avoid any discomfort.
7th Step: Attach the Crossbar to the Box with Screws

- Select one side to keep all the wires before attaching the crossbar.
- Then you should fix the crossbar by using screws with the electrical box. While doing this, you will need someone to help you support the chandelier.
Step 8: Assemble the Wires
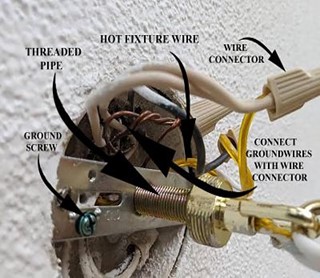
- Now, connect the chandelier’s neutral wire to the neutral white wire of the box.
- The hot wire is the one that is not labeled. Connect that to the hot wire that is mostly black or red.
- Finish the connection by wrapping the ground wire around the ground screw, tightening the screw.
- Attach the end of the wire to the chandelier’s ground wire clockwise and cover the bare wire ends with wire connectors.
9th Step: Finally Cover all the Wires with the Metal Box
- Now adjust all the wires into the metal box.
- The box must be large enough to adjust neutral and got wires separately and cover the protruding threaded support with the Canopy.
- To finish the installation, secure it with a fancy nut.
- Connect all the wires of the new chandelier to the same wires as the old ones were connected.
- With a wire-stripping tool cut down half-inch of the insulating covering if the old wires have twisted or broken ends.
Note: If the connector spins freely without being tightened, discard it, and replace it.
- Fix the Canopy to complete your installation work.
- Adjust the screws or threaded rod if not fit snugly against the ceiling.
- Now check your installation work by adding light bulbs. Then turn on the power and the switch.
Note: If you found dull grey color aluminum wiring there then do not try to take any risk. Hire a certified electrician to complete this job.
Is it Easy to Install a Chandelier?
You might be able to do the work yourself if you are replacing an old chandelier with a new one. If you want to install a chandelier where one did not previously exist, then it will be good to hire an electrician. If any of the wiring leading to the chandelier is old and needs to be replaced, then you will need a professional electrician.
The installation of a chandelier is a popular topic of discussion. Because a chandelier is still a light fixture, some people believe it can be an easy DIY project. However, others think that it’s an electrical issue and should be handled by a professional electrician. While doing your chandelier installation saves money, it is not safe or optimal. Any error can cause a complete electrical system to fail.
Most homeowners think that they can install a chandelier on their own. If you are not comfortable working with electricity, we will recommend you hire an electrician.
Do You Need an Electrician to Install a Chandelier?
Chandeliers are very adaptable, as we may utilize them in our home, farmhouse, or office with both low and high ceilings. We may hold only fifty pounds in a conventional electrical box, which you can find in every light fixture installation. Regular size chandeliers are heavier than that, so you’ll need to figure out if you’ll require a support system before you finish the job. It is impossible for a homeowner and a farmhouse owner to achieve. As a result, hiring a professional electrician is the best alternative. The electrician can deal with chandeliers of any size and their wiring requirements.
How to select an Electrician to Install a Chandelier?
Although an electrician is required to install a chandelier in your home, you must exercise caution when selecting one. Making the wrong decision might lead to regrets and mistakes. You should find a certified and competent electrician. It is critical since chandeliers are fragile, and you must be knowledgeable about their many types to install them properly. Check the electrician’s history and ask for recommendations you can call. Make sure insurance covers the electrician.
Contact us for any professional help. We understand how delicate and yet heavy chandeliers can be. Chandelier installation is a specialty of our competent, certified, and experienced electricians. We finish the job quickly and thoroughly.
Chandelier Installation Costs
Average Cost to Install Light Fixtures
In the USA, the cost of a chandelier replacement varies from $100 to $600. It costs from $150 to $2,000 or more to install a chandelier in an area that does not already have one. These are only installation costs and do not include the chandelier.
| Cost | Typical Range |
|---|---|
| Replacing an old Chandelier | $120-$600 |
| New installation | $150-$2,000 |
When an electrician replaces an existing chandelier, the work should only take one hour to complete. However, there are a few reasons why the price of installing a chandelier may be higher:
The cost of installing a chandelier will also vary depending on the location of the home, chandelier size, and weight, ceiling height, providing with a new power line, the addition of a light switch, putting it up on an extremely high ceiling, and aluminum to copper wire pigtail.
| Professional | DIY | |
|---|---|---|
| Hours | 1.5 | 2.8 |
| Cost | $258 | $175 |
The above-average cost to install a chandelier is a cost comparison between a contractor’s estimate and doing it yourself. The cost of hiring a contractor to mount a chandelier is $258 compared to doing it yourself for $175 and saving 32%.
If you are comfortable handling electrical projects and have a few electrical tools, you can replace a chandelier yourself. But, if your selected chandelier is heavy and large, pay an electrician to perform the job. Another alternative is to use the chandelier’s installation service at the store where you purchased it.
An electrician will charge $258 to replace an old chandelier with a new 6-light chandelier if the existing wiring is intact. This cost includes both labor and supplies. You can save 32% by doing the job for $175, the cost of a moderately priced fixture.
How to Install a Chandelier Junction Box
A junction box is used to secure and connect all the wires and support the weight of the chandelier when you install a chandelier in your ceiling. While it may appear to be easier to push the wires through the ceiling and attach the light to the drywall, doing so could cause a fire and your chandelier falling from the ceiling, along with a significant piece of the ceiling itself. With a retrofit brace and box kit, you can install your box safely and securely.
- Firstly, move a stud sensor across the ceiling in the area where you want to install the junction box for the chandelier. Then mark the ceiling joists lightly with painter’s tape or a pencil.
- Connect a cordless drill to a 4-inch hole saw. Now, you should make a hole in the drywall ceiling.
- Push any insulation away from the entrance by reaching up into the hole. When touching the insulation, make sure you are wearing a pair of work gloves.
- After putting the extensible hanger bar in the ceiling, place the feet where they will rest on the drywall. Now you need to bring the hanger bar up to the ceiling hole and rest the feet on the drywall inside the ceiling.
- Rotate the extensible hanger bar clockwise until you will notice that the teeth on the outside edges of each foot grab a joist in the ceiling. Do not over-tightened the threads inside the hanger bar with an adjustable wrench.
- Then you should place a U-shaped bracket over the hanger bar. Make sure that the threaded ends of the bracket are pointing down.
- Place a center punch over one of the circles on the metal junction box’s outside, commonly known as a knockout. To knock the punch out of the box, hit it with a mallet.
- Now screw the junction box into the threaded ends of the U-shaped bracket. To attach the fixture box to the ceiling, use the locknuts that came with the brace. Using pliers, tighten the nuts.
How to Install a Chandelier in a High Ceiling
Do you want to hang a chandelier since your ceilings are so high? No problem, our expert electricians provide complete high ceiling chandelier installation in the United States.
We can install high ceiling chandeliers that provide a slight lift. It makes cleaning your chandelier as simple as pressing a button. There will be no more ladders or safety worries! We work hard to give you the best possible service and do not leave until the job is completed.
- What is the Procedure for Installing a Chandelier on a High Ceiling?
Simply opening the door and seeing a stunning chandelier that quickly attracts your eye speaks volumes such as a farmhouse chandelier. As a result, most people’s initial thought is, how did they get that up there? With utmost care and ease, our experts will help you dress up your two-story home or farmhouse. Installation of a high ceiling chandelier requires a little more skill, but our experts can handle it just like any other chandelier installation.
Before doing any electrical work in your home, be sure the breaker is turned off. Then, using a non-contact circuit tester, ensure that the power to that area is turned off. As a result, these precautions protect the safety of everyone involved in the installation of a high ceiling chandelier. Our licensed electricians will ensure that the job is done appropriately. We accomplish this by thoroughly assessing the area where you want your chandelier installation. We’ll check the electrical wiring to make sure your chandelier has enough power. We will also examine the installation location.
The key to a successful high ceiling chandelier installation is having the correct tools for the job. Our skilled electricians will use ladders, extension ladders, scaffolding, and even scaffolding to install your chandelier safely.


Leave A Comment